Productive Git setup
When getting started with Git, you don't always know there exist some trick to make you more productive with it. Here are a few, most of which are already in the official documentation.
Installing autocompletion
When working with git from the command-line, it's very useful to have autocompletion for your branch/remote names, git commands, etc. Fortunately, there is a bash script for that.
To achieve this, download this file, put it under your home directory under the name .git-completion.bash, then reference it from your bash initialization file (either ~/.bash_profile or ~/.bashrc) :
source ~/.git-completion.bash
Defining aliases
For common commands
Commands like commit, branch, `checkout are so common that it's useful to type them with fewer characters. To do so, you create git aliases by typing the following commands in a terminal :
git config --global alias.co checkout
git config --global alias.br branch
git config --global alias.ci commit
git config --global alias.st status
Once you have done this, you can type co, br, ci, st every time you would normaly type checkout, branch, commit, status.
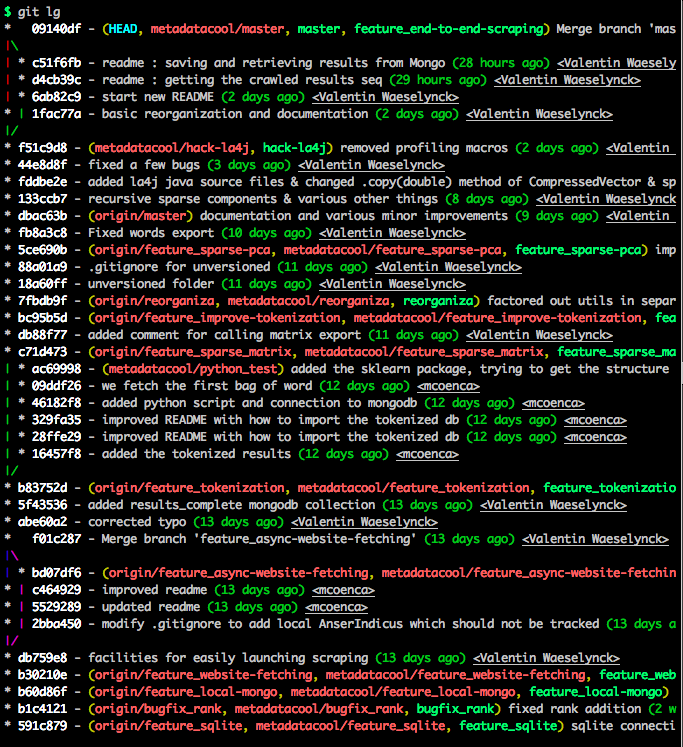
To print the commits graph
The following alias will enable you print a pretty representation of the commits graph in your terminal window :
git config --global alias.lg "log --graph --all --pretty=format:'%C(bold)%h%Creset -%C(auto)%d%Creset %s %C(green dim)(%cr)%Creset %C(ul)<%an>"
`
Now, typing git lg in your repository will print something like this :
The effect of setting aliases is to modify your ~/.gitconfig file, which should now look like this :
   [user]
       name = Valentin Waeselynck
       email = val@bandsquare.fr
  [alias]
       lg = log --graph --all --pretty=format:'%C(bold)%h%Creset -%C(auto)%d%Creset %s %C(green dim)(%cr)%Creset %C(ul)<%an>'
       co = checkout
       br = branch
       ci = commit
       st = status
  [core]
       editor = vim
  [filter "media"]
       clean = git media clean %f
       smudge = git media smudge %f
       required = true
Using a git GUI client
Working from the command line with the above config is enough for 95% of my everyday work. But sometimes, I need a better visualisation tool (e.g for diffs) in my local environment, so I also use SourceTree.